

Saturday, May 8, 2010

Thursday, May 6, 2010
Striped Entry Hall
I did it. I striped my hallway. And with zero help.
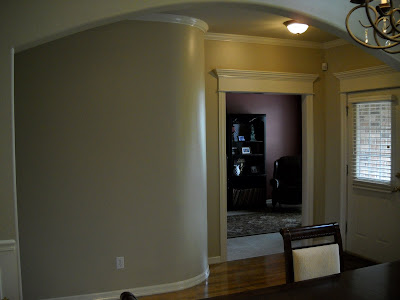
From front door before:


I'm sharing this paint job with:

Thanks to Kathleen for the awesome tips. Check out her hallway.
The curved wall in the entry really makes the space unique. But it was so plain.
View from the dining room before:

From front door before:

Looking towards front door before:

View from dining room after:

View from front door after:

Looking towards front door after:


I'm really digging the look. However, it's like buying a new dress with no purse, shoes or jewelry to match. I need to accessorize!
Entire hallway cost me about $25 bucks (I only used half a can of each paint) and approximately 9 hours of my life.

Looking towards front door after:


I'm really digging the look. However, it's like buying a new dress with no purse, shoes or jewelry to match. I need to accessorize!
Entire hallway cost me about $25 bucks (I only used half a can of each paint) and approximately 9 hours of my life.
I'm sharing this paint job with:
Wednesday, May 5, 2010
Happy Cinco de Mayo

While I do realize that Cinco de Mayo is not the celebration of Mexican spirits and beer, I'm quite certain that a margarita on the rocks after work tonight will be the highlight of my week.
Olé!
Monday, May 3, 2010
Refashioned Clothes
Everyone else in blog land is doing it. I'm joining in.
I took the dress and made a cute little top and shorts for Sophie. I have little sewing experience so it took me a while. The seam-ripper is my best friend.


I raided my closet and found this dress (never worn)


I took the dress and made a cute little top and shorts for Sophie. I have little sewing experience so it took me a while. The seam-ripper is my best friend.


And this shirt. It makes me look pregnant. And that is never a good thing. Unless of course I really was pregnant - which I'm not. Don't go starting rumors.

I took the maternity-esque shirt and turned it into a fun skirt. Soph had a white tee in her drawer so I used extra material and embroidered on a little birdie!


I'm sharing this post with:
Sunday, May 2, 2010
Here Duckie Duckie
I'm sure everyone is familiar with these Smith & Hawken ducks from Target - right?

Welp, I painted mine. To match my new curtains!


Welp, I painted mine. To match my new curtains!

Friday, April 30, 2010
How I Stain
It's so rewarding to have projects in my home that I've "created" and it's even more rewarding when someone wants to know how I did it!


Oil based stains are a bear to remove from hands. And don't come out of clothes. I used to have just one t-shirt that I called my project shirt. Now, I can't find a t-shirt without paint on it.
I learned not to just dunk my brushes in the stain. Just dip lightly and brush on. Otherwise, you get streaks and stuff. If you do get too much in one spot, just rub with one of those old rags.
Next, polyurethane

This is the most time intensive part.
1. Brush on.
Repeat steps 1-5 until insanity sets in. I believe my buffet took about 7 coats. Stair rails - 2.
Tip #3: You can store your used paint brushes in a plastic bag and in the freezer! Just thaw them out about an hour prior to re-starting your project.
Come to think of it...mine are still in there.
What should I start next?
While this isn't a complete tutorial, I will do my best to describe the process I used for my buffet and for my stair railing.
I've only done one other staining project and that was about 7 years ago and it was a hand-me-down table and chairs. I used stain stripper and it took FOREVER.
Tip #1: Buy a small sander.

I spent about $60 bucks on my Bosch sander and it was the best $60 bucks I ever spent. (aside from the money I paid for epidurals with both my kids). Added bonus - men love power tools. You may receive unexpected help.
I have no method of what sandpaper grit I used. Start out with the heavy stuff and work your way to medium and light. Sanding anything creates dust. Lots of dust. The buffet was sanded in the garage. The stair rails were not removed.
If you're working in the garage, an air compressor comes in handy to blow saw dust off your piece. Our air compressor is obnoxious. But they sell small pancake compressors.

Sanding indoors is a mess. So keep your Shop Vac handy and use a mask. I'd also send the children to grandma's.

The stair rails took longer because of all the small crevices. If you're going to stain, you need to get down to raw wood. Stain stripper can help - just be sure to purchase something environmentally friendly. The fumes on that stuff can be extremely strong and probably not good for you.
After sanding and cleaning up your dusty mess wipe down with a rag and warm water. Use something that won't leave lint. Be sure to let it dry completely.
Next comes the fun part - staining!

Tip #2: Wear gloves & really old nasty clothes.
Oil based stains are a bear to remove from hands. And don't come out of clothes. I used to have just one t-shirt that I called my project shirt. Now, I can't find a t-shirt without paint on it.
I started out using old rags to wipe the stain on. I didn't like that method. So, I switched to a paint brush. I actually had 2 brushes - a medium sized and then a tiny one to get close to edges and in crevices. I'm very anal - actually, I'll use the word precise instead.
I learned not to just dunk my brushes in the stain. Just dip lightly and brush on. Otherwise, you get streaks and stuff. If you do get too much in one spot, just rub with one of those old rags.
I used 2 coats of stain. I also threw the brushes away. I didn't know how to get them cleaned. Truth be known - I'm lazy.
Next, polyurethane

This is the most time intensive part.
1. Brush on.
2. Let Dry.
3. Lightly Sand.
4. Wipe down with warm water.
5. Let dry.
Repeat steps 1-5 until insanity sets in. I believe my buffet took about 7 coats. Stair rails - 2.
Both projects took many days to complete. So you might be wondering, "Jenn, how many paint brushes did you go through?"
Tip #3: You can store your used paint brushes in a plastic bag and in the freezer! Just thaw them out about an hour prior to re-starting your project.
Come to think of it...mine are still in there.
What should I start next?
Wednesday, April 28, 2010
Curtains from a Duvet
The curtains in my family room are thick and heavy. Perfect for fall and winter. But its Spring now and I needed a quick and cheap makeover.
These curtains from Anthropology are light, feminine and airy. If I had my own little cottage with no men around, I'd hang these.

Oh, and if I was wealthy. But neither are true.
So, I found this Duvet cover at TJ Max for $49.99. Still a bit costly but I knew I could get 2 panels from it.

Here are my curtains before.

And after!

Before.

After.

I used two white pillow cases and added to the bottom for added length and texture. I dig ruffles but my family room does not. So, I somewhat pleated them instead.


I'm sharing this post with: My Backyard Eden, Sew Much Ado, Life in the Pitts, Beyond the Picket Fence, The Shabby Chic Cottage, Finding Fabulous, Funky Junk Interiors, Under the Table and Dreaming
These curtains from Anthropology are light, feminine and airy. If I had my own little cottage with no men around, I'd hang these.

Oh, and if I was wealthy. But neither are true.
So, I found this Duvet cover at TJ Max for $49.99. Still a bit costly but I knew I could get 2 panels from it.

Here are my curtains before.

And after!

Before.

After.

I used two white pillow cases and added to the bottom for added length and texture. I dig ruffles but my family room does not. So, I somewhat pleated them instead.


I'm sharing this post with: My Backyard Eden, Sew Much Ado, Life in the Pitts, Beyond the Picket Fence, The Shabby Chic Cottage, Finding Fabulous, Funky Junk Interiors, Under the Table and Dreaming
Subscribe to:
Posts (Atom)


